When you transition to a microservices architecture, you usually start with the best intentions: decoupling components to move faster. But reality quickly catches up in production. You often find yourself staring at a black box—a network “spaghetti bowl” where it’s incredibly hard to see who is actually communicating with whom, which service is calling which database, or why a specific request suddenly takes 3 seconds to respond.
Trying to handle security, encryption, and visibility for these flows directly inside the code of each application quickly becomes a nightmare for both developers and Ops teams.
If you’ve never encountered this term before, this is exactly why we use a Service Mesh, and specifically Istio.
What is Istio and Why Do You Need It?
Think of Istio as an automated infrastructure layer that sits right on top of your cluster. Instead of forcing developers to write code for encryption, logging, or traffic routing, Istio handles it transparently at the platform level.
It acts as both an air traffic controller and a bodyguard for your applications:
-
It automatically maps and visualizes who is talking to whom.
-
It secures all inter-service traffic with mutual TLS (mTLS) encryption out of the box.
-
It allows you to shift traffic dynamically (like sending 10% of users to a new version) without changing application code.
If you are running Red Hat OpenShift, the big news is the arrival of OpenShift Service Mesh 3 (OSSM3). This version marks a major turning point: it drops the old custom architectures to align directly with upstream Istio and the Sail Operator. You get the pure, raw power of the industry-standard Istio, perfectly integrated into OpenShift.
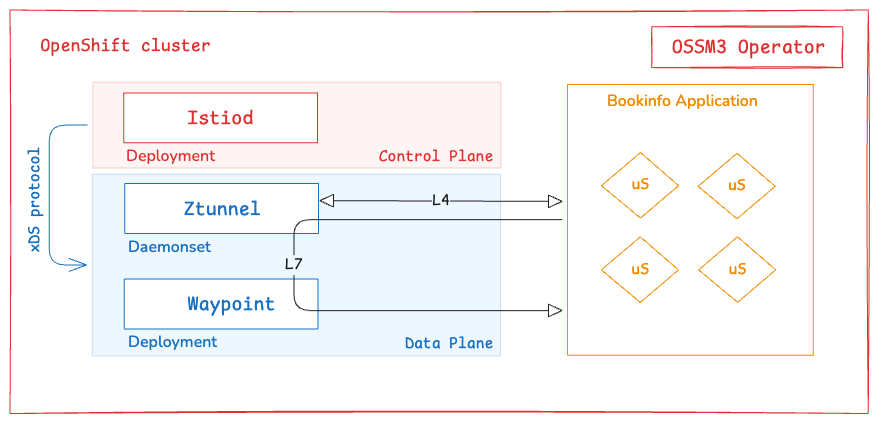
On my lab cluster, I deployed OSSM3 in Ambient mode—Istio’s newest architecture that runs completely sidecarless (without forcing an extra helper container into every single application pod). Instead, it splits the mesh responsibilities into a shared L4 transport layer (ztunnel) and a L7 application routing layer (waypoints).
To demonstrate how to onboard workloads and reclaim control over our network, I am using the standard Bookinfo sample application.
Want to skip the reading and test it?
Every manifest, configuration file, and automation script used in this guide is fully available and ready to replicate on my GitHub repository. Clone it, run it, and let’s build together: Anisse’s GitHub - OpenShift Service Mesh 3 Lab Repos
Understanding the Bookinfo Architecture
Bookinfo is the ultimate “Hello World” for service meshes because it mimics a real-world polyglot microservices application. It is split into four separate services written in different programming languages:
-
productpage (Python): The front-end entry point that calls other services to display the web page.
-
details (Ruby): Manages the book’s metadata.
-
ratings (Node.js): Houses book reviews and star rankings.
-
reviews (Java): Generates the review comments. To test traffic routing, this service comes in three versions:
-
v1: No rating stars.
-
v2: Black rating stars.
-
v3: Red rating stars.
-
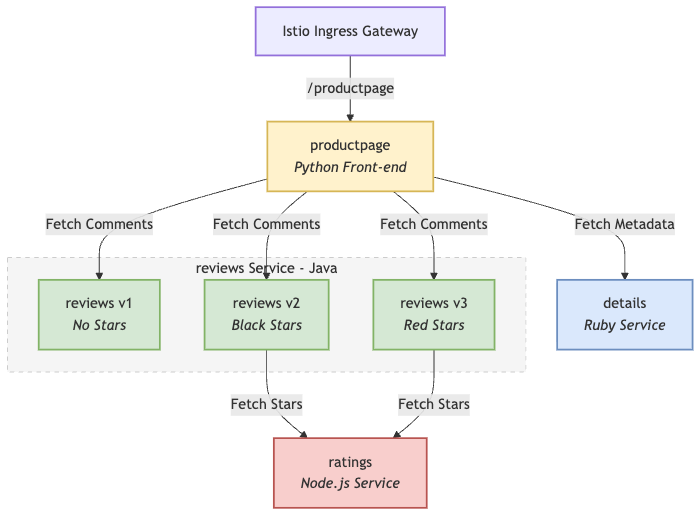
Without a service mesh, Kubernetes simply round-robins traffic across all three reviews versions randomly. Let’s bring order to this chaos.
Setting Up the Istio Control Plane
According to the documentation, Ambient mode splits the data plane into a shared node-level Layer 4 (L4) secure transport proxy (ztunnel) and an optional Layer 7 (L7) application routing proxy (waypoint).
To deploy it properly, we must install three distinct components sequentially: the Control Plane (istiod), the Istio CNI, and the Ztunnel proxies.
Let’s start by creating the dedicated namespace and deploy Istio Control Plane. The Red Hat OpenShift Service Mesh 3 operator should already be installed on your cluster via the OperatorHub.
git clone https://github.com/atiouajni/ossm3-bookinfo-ambient && cd ossm3-bookinfo-ambient
oc create namespace istio-system
oc apply -f single-cluster/manifests/istio.yaml
You should see a message IstioCNI resource does not exist. The Istio CNI node agent is required in the ambient data plane mode.
Install the Istio CNI
The Istio CNI runs as a DaemonSet across your worker nodes. Its primary job is infrastructure automation: it modifies the network namespace of your application pods by injecting custom iptables rules. These rules intercept all raw network traffic entering or leaving your application containers and transparently redirect it to the local ztunnel proxy instance on the node.
oc create namespace istio-cni
oc apply -f single-cluster/manifests/istio-cni.yaml
Install the Ztunnel proxy
Once the CNI daemonset has wired the iptables redirection, we need the actual transport engine. The Ztunnel also deploys as a DaemonSet. It processes the redirected iptables traffic, handling high-performance mutual TLS (mTLS) encryption, L4 telemetry, and cryptographic identity verification using standard HBONE tunnels.
oc create namespace ztunnel
oc apply -f single-cluster/manifests/ztunnel.yaml
Before moving forward, it is a good practice to verify that all three core components of our Ambient infrastructure are up, running, and healthy across their respective namespaces.
Run the following command to check the cluster-wide status of the Istio components:
oc get pods -A -l app.kubernetes.io/part-of=istio

NAMESPACE      NAME                     READY   STATUS    RESTARTS   AGE
istio-cni      istio-cni-node-4wvf8     1/1     Running   0          5m4s
istio-system   istiod-f8cc56c44-jt27s   1/1     Running   0          5m7s
ztunnel        ztunnel-fhpsl            1/1     Running   0          2m22s
Onboarding the Bookinfo Application
Our new intelligent network is up and running. Now, let’s move on to deploying our BookInfo application.
Let’s create our application project and deploy Bookinfo:
oc create namespace bookinfo
oc apply -f single-cluster/bookinfo/bookinfo.yaml -n bookinfo
oc apply -f single-cluster/bookinfo/bookinfo-versions.yaml -n bookinfo
Thanks to the automated combination of Istio CNI’s iptables rules and Ztunnel orchestration, onboarding our new workloads requires no pod restarts. We simply tag the namespace, and the infrastructure shifts dynamically underneath. (Istio with sidecar need to restart all pods to include the sidecar)
oc label namespace bookinfo istio.io/dataplane-mode=ambient
Once the label is applied, how do we know the mesh has actually accepted our new namespace? The absolute source of truth is watching the Ztunnel logs. The node-level transport proxies instantly pick up the new workloads and register them into their internal routing database.
You can check the local Ztunnel logs with this command:
oc logs -n ztunnel -l app=ztunnel --tail=100 | grep -E "bookinfo|statemanager"
In this post, I am going to test Istio’s L4 and L7 capabilities. To do that, I need to add the Waypoint proxy to my Istio infrastructure.
Managing L7 Traffic
To deploy a Waypoint proxy, Istio now allows us to use the native Kubernetes Gateway API directly. All we need to do is create a Gateway custom resource, and Istio will automatically spin up an Envoy proxy instance to act as our Waypoint.
oc apply -f single-cluster/manifests/waypoint.yaml
Enroll the bookinfo namespace to use the waypoint :
oc label namespace bookinfo istio.io/use-waypoint=waypoint
Choosing Our Routing API: HTTPRoute vs. VirtualService
If you are familiar with older versions of Istio, you might be tempted to use the classic VirtualService CRD, which historically offered a wider range of advanced legacy features. (It was my case)
However, there is a major architectural catch in OpenShift Service Mesh 3.3: using VirtualService inside Ambient mode is currently considered Alpha. Because Ambient mode completely decouples L4 and L7, its Waypoint proxies are designed to natively look for Kubernetes Gateway API resources. To keep our production environment stable and aligned with upstream standards, we will use the modern HTTPRoute API for our Canary deployment.
Deploy the Ingress Gateway Infrastructure
To allow traffic to the mesh, we need our front door infrastructure in place. In OpenShift Service Mesh 3.3, we declare a Gateway resource using the native Kubernetes Gateway API. Under the hood, the operator provisions a Kubernetes Service called istio-ingressgateway inside the istio-system namespace.
oc apply -f single-cluster/manifests/istio-ingress.yaml
oc apply -f single-cluster/manifests/ingress-routing.yaml
By default, Istio creates a LoadBalancer service for a Istio ingress Gateway. As we will access this gateway by a tunnel, we don’t need a load balancer.
oc get svc -n istio-system

NAME                  TYPE           CLUSTER-IP      EXTERNAL-IP   PORT(S)                                 AGE
istio-ingress-istio   LoadBalancer   172.30.158.54   <pending>     15021:31395/TCP,80:31818/TCP            40s
istiod                ClusterIP      172.30.183.71   <none>        15010/TCP,15012/TCP,443/TCP,15014/TCP   6m6s
Change the service type to ClusterIP by annotating the gateway:
oc annotate gateway istio-ingress networking.istio.io/service-type=ClusterIP --namespace=istio-system
Routing traffic using waypoint proxies
At this stage, I am going to introduce different traffic routing scenarios. Feel free to apply only the one that interests you.
oc apply -f single-cluster/bookinfo/routing-scenarios/route-reviews-90-10.yaml
#OR
oc apply -f single-cluster/bookinfo/routing-scenarios/reviews-v1-only.yaml
#OR
oc apply -f single-cluster/bookinfo/routing-scenarios/reviews-v2-only.yaml
#OR
oc apply -f single-cluster/bookinfo/routing-scenarios/reviews-v3-only.yaml
Connecting the Outside World (Exposing the App)
Now that our internal routing is ready and our Ingress Gateway infrastructure is up, we can safely bind our public application path mapping to it:
oc create route edge mesh-ingress --service=istio-ingress-istio --port=http --insecure-policy=Redirect -n istio-system
Time to Play: Experiment with Routing and Security
You can go ahead and have fun experimenting with the different routing and security scenarios! I’ve packed everything into a single directory in my GitHub repository, so you can just apply the manifests that interest you.
oc apply -f single-cluster/bookinfo/routing-scenarios/<routing-scenariors>.yaml
(BONUS) The Critical Security Trap: Mesh Bypass
Even if you configure Istio AuthorizationPolicies to state who should talk to whom, OpenShift’s default cluster network still allows any pod in any namespace to hit your application’s private pod IP directly if it discovers it.
An attacker pod can completely skip the Waypoint and the mesh proxies, leaving your application vulnerable and your security team blind.
To achieve a true, uncompromised Zero-Trust state, you must back up Istio with an OpenShift NetworkPolicy to drop non-mesh traffic at the cluster SDN layer:
oc apply -f manifests/network-policy-lockdown.yaml
Conclusion: Reclaiming Control (But the Journey Isn’t Over)
Remember the network “spaghetti bowl” and the frustrating black box we talked about at the beginning? By onboarding our workloads into OpenShift Service Mesh 3.3, we have successfully built the infrastructure to fix it. Ambient mode has made the operational transition frictionless—giving you transparent mutual TLS encryption and granular Layer 7 traffic routing without a single application pod restart.
But let’s be entirely honest: the black box isn’t fully shattered yet.
While the mesh is collecting rich telemetry data under the hood right now, trying to parse network flows using raw CLI commands or scanning log files is still incredibly complex and tedious. You can’t easily visualize a spaghetti bowl using text.
To truly claim victory over our visibility gap, we need a visual interface that translates these raw data streams into an interactive topology map.
That is exactly why Kiali is mandatory. In our next post, we will look at how to configure Kiali on top of OSSM 3.3 to dynamically visualize our entire service mesh traffic graph in real-time. Only then will we finally see who is talking to whom at a single glance. Stay tuned!
Happy building!